Get Free Trial Week Developer Access, Try Before You Hire. Click Here to Claim Now


Machine learning is the way toward showing a framework how to make exact expectations when taken care of information. For iOS developers, Apple has furnished us with AI instruments like Core ML, and AR pack. We Use Core ML to integrate machine learning models into our app. Core ML provides a unified representation for all models. Your app uses Core ML APIs and user data to make predictions, and to train or fine-tune models, all on the user’s device.
Core ML supports Vision for analyzing images, Natural Language for processing text, Speech for converting audio to text, and SoundAnalysis for identifying sounds in audio. Those forecasts could be noting whether a bit of natural product in a photograph is a banana or an apple, spotting individuals going across the street before a self-driving vehicle, regardless of whether the utilization of the word book in a sentence identifies with a soft cover or an inn reservation, whether an email is spam, or perceiving discourse precisely enough to create subtitles for a YouTube video.
Model for machine learning
A model is the result of applying a machine learning algorithm to a set of training data. You use a model to make predictions based on new input data. Models can accomplish a wide variety of tasks that would be difficult or impractical to write in code. For example, you can train a model to categorize photos, or detect specific objects within a photo directly from its pixels.
Getting a Core ML Model
Core ML supports a variety of machine learning models, including neural networks, tree ensembles, support vector machines, and generalized linear models. Core ML requires the Core ML model format (models with a .mlmodel file extension).
1. Apple provides several popular, open source models that are already in the Core ML model format. You can download these models and start using them in your app.
2. You can use a wide variety of other machine learning libraries and then use Core ML Tools to convert the model into the Core ML format. Once a model is on a user’s device, you can use Core ML to retrain or fine-tune it on-device, with that user’s data.
Advantages
1. Core ML optimizes on-device performance by leveraging the CPU, GPU, and Neural Engine while minimizing its memory footprint and power consumption.
2. Running a model strictly on the user’s device removes any need for a network connection,
3. It helps keep the user’s data private and your app responsive.
Create machine learning models for use in your app
We can use ML with familiar tools like Swift and macOS playgrounds to create and train custom machine learning models on our Mac.
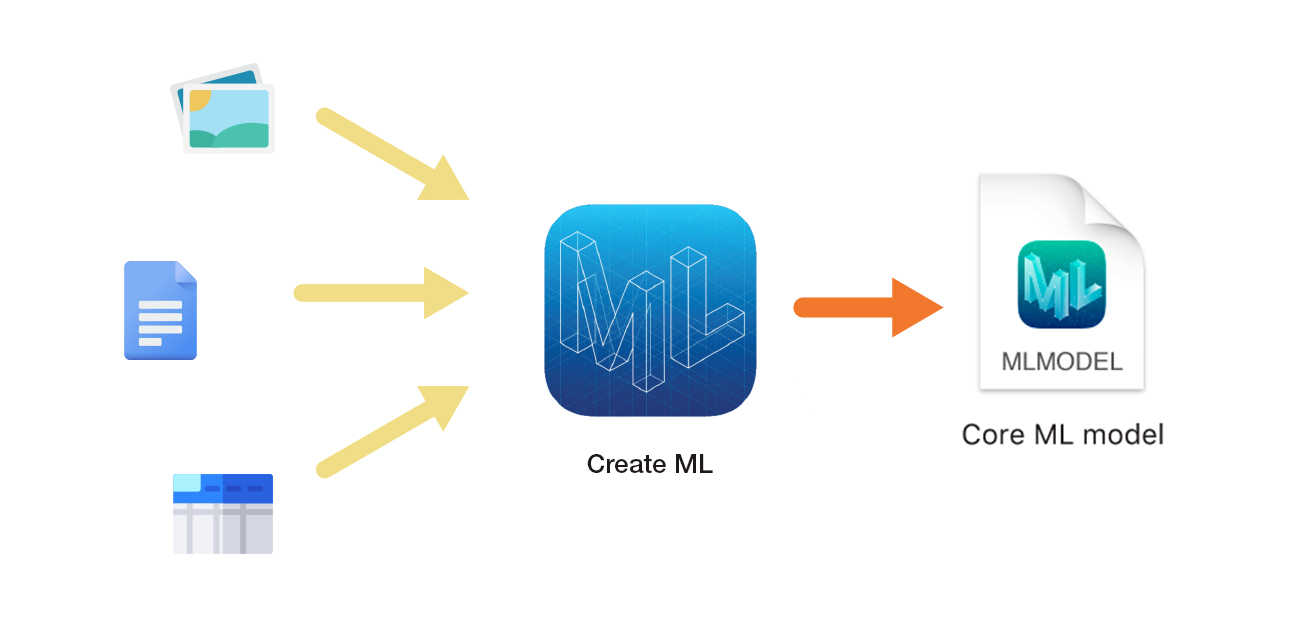
You train a model to recognize patterns by showing it representative samples. For example, you can train a model to recognize dogs by showing it lots of images of different dogs. When the model is performing well enough, you’re ready to integrate it into your app using Core ML.
Integrating a Core ML Model into the App
Add a Model to Your Xcode Project: Add the model to your Xcode project by dragging the model into the project navigator.
You can see information about the model—including the model type and its expected inputs and outputs—by opening the model in Xcode.
Or we can Create the Model in Code
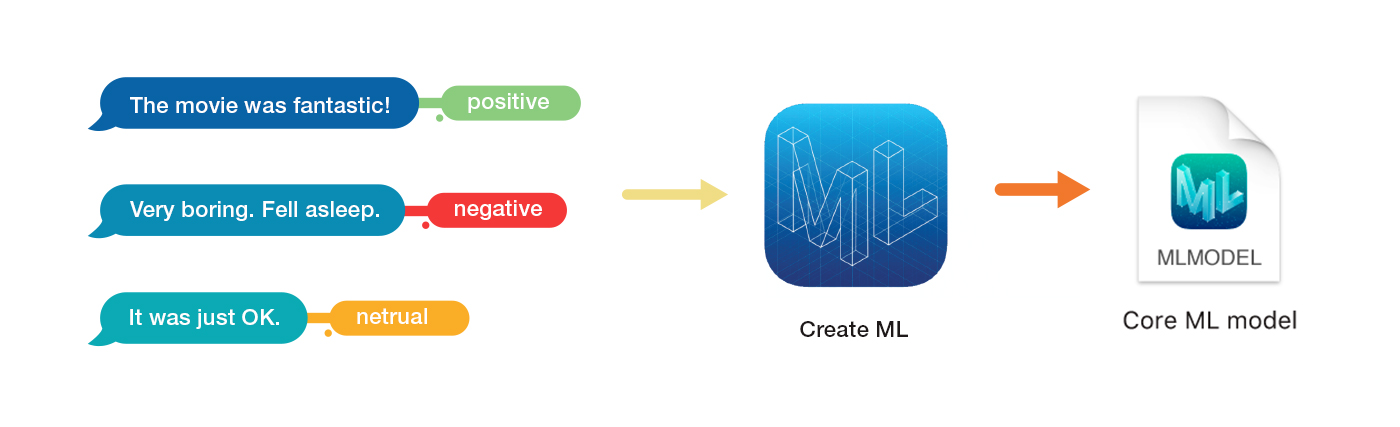
A Text Classifier Model: A text classifier is a machine learning model that’s been trained to recognize patterns in natural language text, like the sentiment expressed by a sentence.
You train a text classifier by showing it lots of examples of text you’ve already labeled—for example, movie reviews that you’ve already labeled as positive, negative, or neutral.
Import Data:
Start by gathering textual data and importing it into an MLDataTable instance. As an example, consider a JSON file containing movie reviews that you’ve categorized by sentiment. Each entry contains a pair of keys, the text and the label. The values of those keys are the input samples used to train your model. The JSON snippet below shows three pairs of sentences with their sentiment labels.
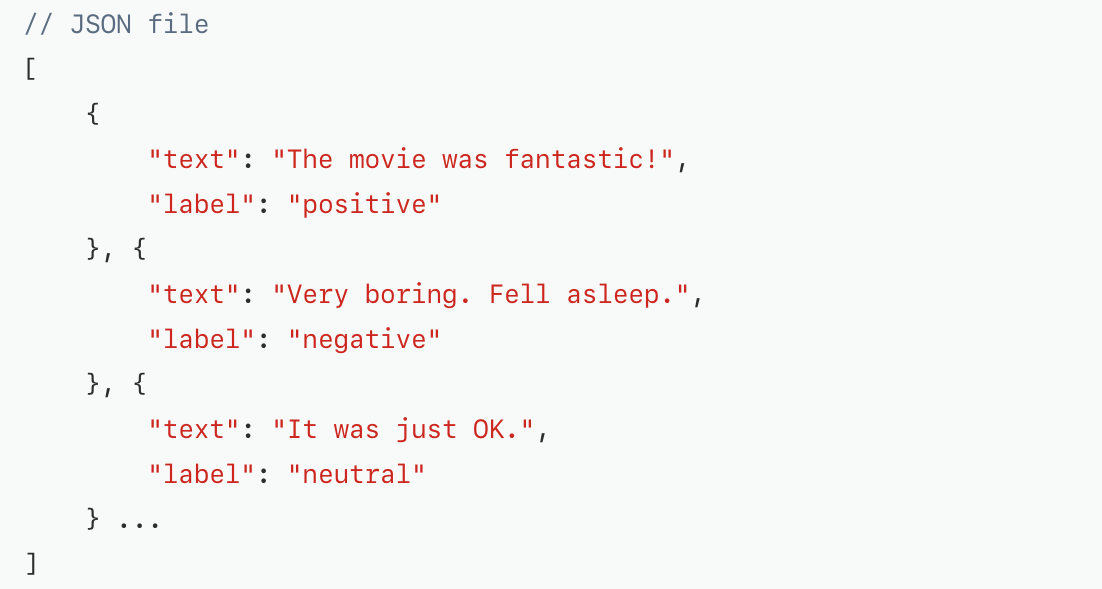
In a macOS playground, create the data table using the init(contentsOf:options:) method of MLDataTable.

The resulting data table has two columns, named text and label, derived from the keys in the JSON file. The column names can be anything, as long as they are meaningful to you, because you'll use them as parameters in other methods.
Preparing Data for Training and Evaluation:
The data you use to train the model needs to be different from the data you use to evaluate the model. Use the randomSplit(by:seed:) method of MLDataTable to split your data into two tables, one for training and the other for testing. The training data table contains the majority of your data, and the testing data contains the remaining 10 to 20 percent.
Create and Train the Text Classifier:
Create an instance of MLTextClassifier with your training data table and the names of your columns.

During training, Create ML puts aside a small percentage of the training data to use for validating the model’s progress during the training phase. The validation data allows the training process to gauge the model’s performance on examples the model hasn’t been trained on.
To see how accurately the model performed on the training and validation data, use the classificationError properties of the model’s trainingMetrics and validationMetrics properties.

Evaluate the Classifier’s Accuracy:
Next, evaluate your trained model’s performance by testing it against sentences it’s never seen before. Pass your testing data table to the evaluation(on:) method, which returns an MLClassifierMetrics instance.
![]()
To get the evaluation accuracy, use the classificationError property of the returned MLClassifierMetrics instance.

Save the Core ML Model:
Use the write(to:metadata:) method to write the Core ML model file (SentimentClassiifer.mlmodel) to disk. Provide any information about the model, like its author, version, or description in an MLModelMetadata instance.

Add the Model to Your App
With your app open in Xcode, drag the SentimentClassifier.mlmodel file into the navigation pane. Xcode compiles the model and generates a SentimentClassifier class for use in your app.
Create an NLModel in the Natural Language framework from the SentimentClassifier to ensure that the tokenization is consistent between training and deployment. Then use predictedLabel(for:) to generate predictions on new text inputs.

This was just one example of Machine learning. For more detailed information, kindly visit developer.apple.com.
Source: developer.apple.com
Github: https://github.com/manekdilip/Machine-Learning-and-AI-iOS---Swift/tree/master
ML was always intended to and is now being anticipated to bring massive changes in not just the field of IT, but all over the globe. Every mobile app development services provider company is today on the constant lookout to have developers who can work comfortably on such frameworks, and help in creating unique ML-based mobile apps.

![How to Patent an App Idea in 2024? [A Complete Guide]](https://mt.dev-project-server.com/storage/blog/image/1699424466.webp)


Subscribe to Our Newsletter!
Join us to stay updated with our latest blog updates, marketing tips, service tips, trends, news and announcements!


